Micro908
![]()
Simple Mod for LCD Backlight Control
|
|
Micro908
Simple Mod for LCD Backlight Control |
|
Here's a simple modification that will greatly increase the usability of your Micro908 instrument in low-light conditions. The stock Micro908 Kit comes with an LCD that does not have a backlight, but if you substitute a pin- and size-compatible one, you can add a transistor and two resistors to have the backlight turned on under software control in the AA-908 program. A configurable timer will turn the backlight off after a preset time period, thus saving precious battery power in the field. Then when you move the dial or press a pushbutton control again, the backlight will again turn on for that preset interval. Pretty cool!
You'll need to be running the latest software (v4.3a or greater), as posted on the main Micro908 project page. The software is compatible even with those units that do not have this backlight mod.
Here's a view of my Micro908 instrument with the backlight mod done. It's only a little brighter in normal daylight conditions, but check out the pics below under non-optimal low light conditions to see a vast improvement.
.JPG)
.JPG)
If you are using the Micro908 in low-light conditions, or even if you just have an awkward angle while looking at the screen, you can notice here the tremendous improvement in readibility of the display. The shot on the left was taken with the backlight timed out, with no flash in a dimly-lighted room - pretty tough to see the display, eh? I moved the dial slightly to re-trigger the backlight timer and took the shot on the right - notice how the display stands out like a beacon!Parts List:
LCD with Backlight - Mouser p/n HDM16216L-5-L30S ($14.32) is pin-compatible and size-compatible with the stock LCD supplied in the Micro908 Kit.
Transistor - 2N2222A
Resistor - 1K, 1/8 W
Resistor - 47, 1/2 W
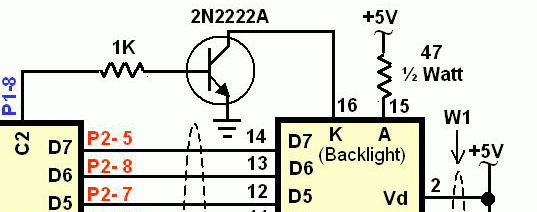
Here's a segment of the updated Micro908 schematic (rev A3) showing the addition of the two resistors and the transistor. The HC908 microcontroller daughtercard port C2 (located on P1 pin 8) is used to drive the 2N2222A transistor through a base resistor of 1K-ohms. When the backlight control bit C2 is logical high, the transistor turns on and allows current to flow through the LED on the LCD display, thus turning on the backlight of the display. The 47-ohm, 1/2W resistor limits current to about 80 ma ... the maximum LED current for this display is 120 ma, so the resistor could get smaller yet (~39 ohms, minimum) to provide for an even brighter backlight.
The extra components of this modification are easily installed, without cutting any traces. The 47-ohm resistor is placed across pins on the LCD, going from pin 2 (+5V) to pin 15 (LED anode). The 2N2222A transistor's collector goes to LCD pin 16 (LED cathode), and it's emitter goes to ground on pin 5 of the serial RS-232 connector J2 conveniently below the edge of the LCD. The 1K resistor connects the base lead of the transistor to J1 pin 8 (4th pin down on the left side of that connector ... just tack solder to the stub seen on that pin.)
The only compromise in making this modification is that the shell for the LCD on this backlighted display unit is slightly taller than what the vertical space allowance permit. But all that is needed to to cut away the portion of the plastic overlay that covers the LCD hole in the plastic enclosure, thus allowing the LCD to protrude up through the front panel. Just lay the top half of the enclosure on a flat hard surface that can take some scratches, and carefully scribe along the inside of the hole as shown above until the plastic rectangle is fully and cleanly free.
.JPG)
The result of the cutout is shown above from the top (shown on the left) and from the bottom (shown on the right). The LCD bezel itself is black, so it blends quite well with the black ink bezel remaining on the overlay. Look carefully at the full-resolution image of the top photo to see that the aesthetics of the front panel are still quite beautiful!
(Click any photo on this page to see a larger, full-resolution view.)
![]()
Page last updated: Feb 10, 2010
.JPG)
.JPG)
.JPG)
.JPG)
.JPG)
.JPG)
.JPG)